


How To Take Great Photos At Disney
While I'm no professional photographer, it is something of a hobby to me to understand composition and catch a great shot when I can. In this post, I'm going to share some Do's and Don'ts of taking great photos at Disney,, and provide lots of examples of photos I've taken myself to show these concepts. Consider this Disney photography 101. Let's get started...

Do: Take a lot of photos
We're way past cameras that required film, but back in the day when I had to take a camera with film, I still took 12 rolls of 24 frames which allowed a whopping 300 photos, but I had to be more choosy. Now that we have digital cameras and smartphones, you can snap away. The greater volume of pictures, the greater chance of capturing some great gems.
Don't: Spend all your time taking photos
While volume is helpful, put the camera away most of the time and enjoy where you are and the people you are traveling with. While I take a good volume of photos, most are taken when we're on a break, or while walking by something.
Don't: Take equipment you don't need
My iPhone takes better photos than any other camera I've owned. I know there are fancier cameras out there that can zoom better and take higher resolution pictures. My feelings about zoom are that the more you zoom, the more grainy your photo and the more blurry from just your breathing the photo gets. And as for resolution, on a photo printed on a normal 3X4 or 4X5 size, the human eye can't discern a difference beyond 5 megapixel resolution. The only time that ultra-high resolution is going to be important is if you plan to print your photo much larger, in which case many phones can also handle that.
Do: Clear space and bring power
If your smartphone is going to be your primary camera, it's going to be doing double (maybe triple) duty. Before your trip, remove some unnecessary apps, podcasts, songs, old photos, audiobooks, etc, to make room for all the pictures you want to take.
Also, bring a power bank. I'm in love with Anker products. This one fits in my pocket and can charge my phone twice.
Do: Add interest by getting an angle
Don't be afraid to kneel down and aim up. You can get some really great pictures this way. This is best for tall subjects, but also for subjects you just want a different perspective with.

Getting low for a picture of some scenery in Frontierland
Don't: Forget other guests are waiting
We are talking about Disney here, so there will be lines - even for certain photo ops! Fountains, park wienies, statues, and characters all offer the opportunity for photos, and generate lines. When it's your turn to get that photo of your family, take one or two and move on. Consider the people around you.
Do: Capture the little things
When I return from Disney, I don't need 20 photos to remind me what Cinderella's castle looks like, although I probably have at least that many because that's how I am. But what I might not remember are those amazing park details.
Some subjects unique to Disney that I love to take photos of are:
Bathroom signage - Call me crazy, but the bathroom signs are themed!
Trash cans - see above!
Posters/fake ads that add to the theme
Lamp posts
Other people's reactions - if you have children, get your kid's face watching the parade or fireworks. You won't be disappointed
Click the arrows on the slideshow below to see examples of this.

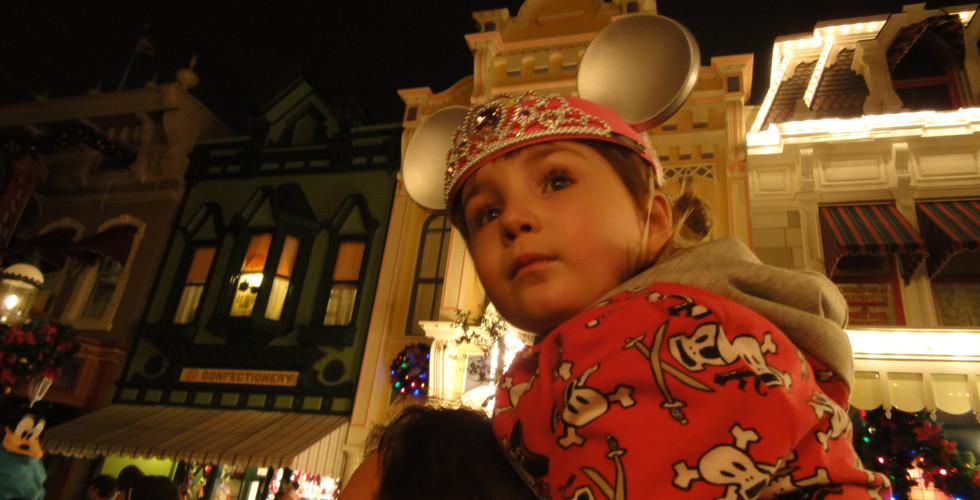


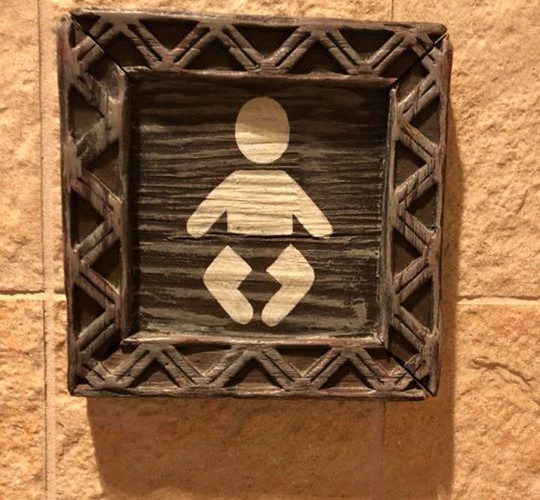


Some examples of photos of details and reactions
Do: Frame it
Is there something convenient in the foreground to make a nice frame for your picture? Use it!
Click the arrows on the slideshow below to see examples.


Examples of framing
Don't: Use flash all the time
(aka, my diatribe against flash)
You do not need flash. There, I said it.
And for the love of Walt, do not use flash on dark rides. Dark rides are meant to be dark. Do not explode your mini-sun into it. You will ruin your picture and the experience of other guests.
I find flash rarely useful, and I have to chuckle at all the times I see flashes going off during the nighttime fireworks.
Here's how flash works: It lights up the foreground really brightly for a split second. You will not get a picture of the fireworks which are distant and bright themselves if you use flash. You will instead get a picture of the tops of other people's heads and something dim going on in the sky in the background. You won't get a picture of Nemo swimming by if you use flash in a dark ride. You will instead get a picture of a blank screen and possibly a well-hidden (usually) emergency exit.
So, get used to the default setting of flash being off. Don't even let your camera go into "auto" mode and choose for you - switch it to OFF. Use flash only if you want to light the foreground and not the background. If your eyes are seeing fine what you wish to capture with your camera, then take the picture without flash.
Now, if it's very dark, you might want a long exposure. Most cameras will do this on their own now. The trick to a long exposure, though, is to hold the camera steady. You might want a tiny tripod for this. I did that once, but carrying it around, even if it was tiny, was annoying. Now, I just rest my camera on a fence, wall, table, trash can, or whatever other stationary object is nearby to lend some stability.
Click the arrows on the slideshow below to see examples of how well photos turn out without flash.


These pictures require flash to be "off" to turn out
Do: Capture the unexpected
That time your kiddo got paint somehow all over their face when painting the cooperative mural at the Festival of the Arts? Capture it.
Or that time the ice cream melted faster than it could be eaten? Yeah, get that too. These are what memories are made of, and what your camera is made for.

Mickey bar aftermath
Don't: Assume the subject must always be in the center
Pictures can actually be more interesting when the subject of the photo is in a corner third of the frame.

Example of the subject not being centered
Finally, I know this entry is long. It's something I'm passionate about. But I'd be leaving an important part of memory making out if I didn't address the Photopass and Memory Maker services you can also purchase through Disney.
How Photopass works is Disney has photographers placed throughout the park. A Photopass photographer will take your family's photo. They are often stationed near character greeting areas and in front of heavily photographed spots (there are about 3-5 on Main Street USA alone just to capture castle pics).
You line up at a Photopass photographer and when it's your turn, they take several photos of your group and then scan your magic band to link your photos to your account. The fun part here is they can also add some Disney magic to your pictures with "magic shots" in a few of your pictures.
There is no charge to get your photos taken or view them online for a limited time. To download or have prints, you will have to purchase those photos online.
Memory Maker is an add-on to this that allows you digital download of ALL of your Photopass pictures including some stock photos Disney throws in and ride pictures.
These services are great if any of the following are true:
You don't want to take pictures
You want to be in your family's pictures
You want all of your ride photos (Memory Maker)
You don't mind the cost of Memory Maker - currently $169
You have certain kinds of Annual Pass (Disney Premier Pass, Disney Platinum Pass, Disney Platinum Plus Pass, and Disney Gold Annual Pass) - because this is included!

A Photopass magic shot, shared because I purchased Memory Maker
I hope this post has given you a lot of information and ideas about how to capture those memories from your Disney trips! If you have questions or tips you want to share, contact us at the email above!


